Showing posts with label Side tables. Show all posts

Tuesday, February 24, 2015

Operation Guest Room Recovery

Remember this padded headboard and these side tables and this guest room reveal? Well, we decided to upgrade the entire guest room using the same materials and spending little to no money. It's great to see how far we have come in 2 years. We have worked on some amazing projects and still have a lot more lined up that just amaze me. I’m so excited and thankful for how how far JT and I have come. We also have amazing friends/mentors who have been instrumental to improving our home decor, woodworking and designing skills. 
First off, here is where we started from. 

Guest Room Before
Not too bad but the side tables were starting to bother me (seeing as we are now such great builders :) ). I really hated our attempt at staining the wood; the construction was a little too shabby. Our first move was to disassemble all 4 side tables and reconstruct them into 2 side tables. We wanted to maintain a modern look with open storage so JT and I came up with a design. The original tables were 2 different sizes so the resulting tables are 2 different sizes. 

new design
We painted them grey and added a silver drawer pull to give the illusion of a drawer. I am pretty sure some guests will pull on the dummy drawer and be shocked .

side table with grey paint
The next project was a quick one, I updated the map shades. I wanted to the lamps to the side table. I followed this tutorial here without the ribbon.

materials used

refinished lamps
And finally the Pièce de résistance….the head board!!!! We got some lovely purple upholstery fabric that was on Mega sale with silver nail head trim to update the headboard.
We wanted some curves to the room so after taking of the backing fabric and taking off come of the foam and batting we measured some points, used a bowl to cut off the curve and then used the first piece to cut out the second piece
cut off 2 corner arcs using a plastic bowl
Next, we roughly cut off about 1/2 and inch off foam around the top and sides for the nail head trim.
The hardest part by far was adding on the nail head trim. That took about 2 hours while everything else took minutes. We started with the top, continued to the right side and finally the left side. 
 
adding the nail-head trim
We used a cover button kit to make 7 buttons. After some measurements we placed 3 buttons on the top row and 4 buttons on the bottom. The bottom half of the headboard is covered by pillows so we didn't see a need to have more than 2 rows. We passed the buttons through the holes using a long embroidery needle and embroidery thread. 


back view of holes for buttons
Buttons on 
Finally, with some team effort and nip-tucking we secured the bottom using the staple gun. I reinforced the entire perimeter at the back then attached the back cover to kepe things neat (felt from the old headboard)


back cover to keep things neat and tidy
These were a really fun projects, it took about a day to get all three projects done.

ready for guests 
I believed Operation Recovery was a success if I do say so myself.

Saturday, September 7, 2013

Hello Yellow


Remember I talked about my obsession with spray paint and a new project I am working on in my previous post? Well, I decided to spray paint our bedside lamps yellow. I used the same brand of spray paint + primer and we love how they turned out.

Hers and His lamp (before)

 Of course, I have to have the fancier lamp (on the left)

Lamps spray painted in our "Garage workshop"
I also spray painted the little knobs that go on top of the lamps.

Yellow lamps....hmm something is still missing

I love how the blue frames compliment the yellow lamps

This is one of the easiest DIY projects I have done by myself, everything turned out beautifully as you can see.


Tuesday, March 27, 2012

Side Tables

As mentioned in the previous post, we took a first stab at DIY projects with the bookcase which was a great success (if I say so myself). Our main plan was to build a padded headboard and I figured it would be nice to get some modern side tables to go with the headboard and also make something for the headboard in CB’s room since we plan on having 2 guest rooms in the future.
The first step was to look for something we both agreed on and we found the following side tables online and we both liked them or maybe CB pretended to so I’m happy. He has totally gotten the happy wife = happy life concept J
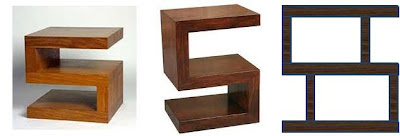
Some modern side table ideas I found and our design on the right
The step was to determine the dimensions we would like for the 2 sets of side tables since we had a queen sized bed and a full sized bed.
We went with 18-inches long side tables for the full bed and 15-inches long tables for the queen bed.
We went to the hardware store and purchased 2-6 feet long, ¾ inch thick, 12 inches (1 foot) wide pine wood planks and 1-4 feet long plank.  
We cut the planks into the following pieces thanks to the awesome folks at the hardware store
  • 3- 18” long pieces of wood
  • 3- 15” long pieces of wood
  • 8- 11” long pieces of wood
CB brought out his power drill, screw driver and some 1 ½ inch nails and we got to work.
Below are pictures of the process and final products. The grand reveal will be a separate post after the padded headboard tutorial.
Planks already cut from the hardware store

CB drilling holes for the screw
  
It's coming together
  
Modern side table is complete
  
Comparing old and new
  
Last side tables completed
  
Stained and left to dry